Saturday, April 12, 2008

Patchwork Strawberries


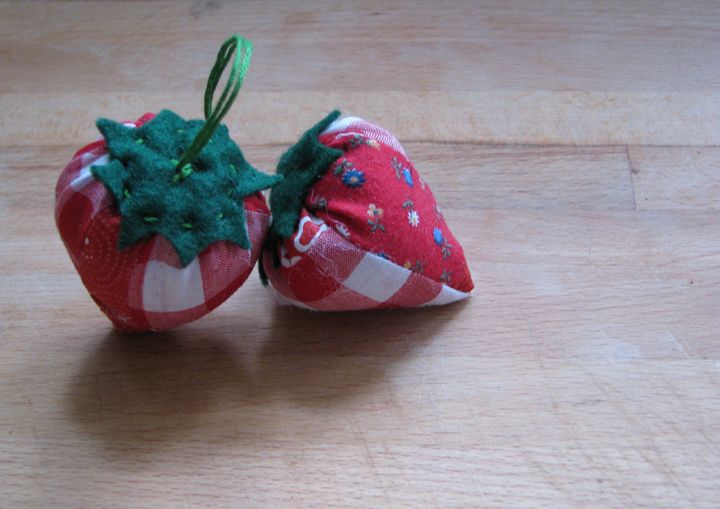
I've been working on some felt foods for Brodi's upcoming birthday and I had a brain burst whilst sewing some slices of bread. What about combining quilting and fabric food? Hence, these patchwork strawberries. I started with some random bits of coordinating fabrics (some vintage some new) and just started sewing them together. When I had them all sewn together I cute the whole piece into strips and re-sewed them back together, mixing up the orientation, then I repeated that process a few times to get a patchwork square. I then cut a circle from the square and cut the circle in half. Then, sewing the two flat sides of the semi-circle together formed a cone. A little stuffing and then some gathering created the strawberry shape. A little felt cap and a string stem topped them off. I think these would be super cute on a gift, tree decorations or even just lying about on a shelf. I'm now eyeing my yellow fabrics and thinking some summery lemons would be nice...

Recycled Crayons


I saw this awesome idea on this post http://www.craftster.org/forum/index.php?topic=235023.0 and thought this would be a great project from my three year old and I to do together. I bought some dollar store crayons, broke them into small bits and had Brodi June place them in the muffin tin (which I also picked up at the dollar store). We put them in the oven at 150 degrees for about 25 minutes until the wax had melted. I took them out and swirled the wax with a toothpick and let them cool for about a half an hour in the freezer. They popped out of the tin really easily and I cut them in half so they'd have a good point. There's also an article in the Good Things for Kids magazine by Marthat Stewart, you could use for directions. They used a heart shaped tin, which is super cute. It'd be fun to do some different shapes. Brodi loves coloring with these and it was such a fun, easy afternoon project!

Etsy Shop is Open for Business!

Horray, I finally finally opened my Etsy shop. Come on in...

Wicked Cardigan


Hi all! I recently finished a Wicked Cardigan. I was inspired by this beautiful version.

I couldn't find the original Craftster thread but I think it was in the Wicked sweater knitalong. The original pattern from Zephyr Style is fantastic and is really great for modifying and creating your own unique sweater. My modifications were pretty simple. I added 18 stitched for the button band and changed the seed stitch sleeve and bottom bands to ribbing. I have a previously knit Wicked sweater that I used the seed stitch on and didn't like how non-stretchy it was, so I thought I would try ribbing on this one. I used Malabrigo in the Sealing Wax color and made my own fabric covered buttons. I'm so thrilled with how it turned out and love how it fits.

The Lady E


I spent some time last weekend photographing some past projects and will hopefully do the same this weekend. I'm getting a good stockpile, so I'll have plenty to post in the next few weeks!

This is my lovely Lady Eleanor stole from Scarf Style. I knit it usting Noro Silk Garden in color 249. This was an amazingly fun project and I learned a lot of new skills (like knitting backwards! which I highly recommend). It took me about a month of on-and-off knitting to finish, mostly because every few rows I had to stop and admire how lovely the colors are. I absolutely the love the rustic look and feel so I haven't blocked it which I think would smooth it out a little too much. I'm not completely happy with the fringe so I'll most likely rework it. I started with the knotted fringe but it was just a little too fiddly for me and went with a regular fringe instead which I think is just too long. It already engulfs me so I really don't need another 2 feet of fringe and it also tends to tangle quite a bit. All-in-all, quite a satisfying project.

Meet Louise


Meet Louise. She's a marveously sweet kitty that I whipped up for Brodi June.
She's from the Wee Wonderfuls Put Together Book No.1. You can purchase the pattern here. The pattern is so wonderfully easy and so perfect for cutomizing your own kitty, bunny or bear. I sewed Louise in an afternoon... The most time consuming part was trying to decide what fabric to use! Also check out the Put Together Book No. 1 gallery. It's great for ideas and inspiration.